EzyFox Server Project Configuration
Updated at 1685685344000application.properties file and application.yaml file in your classpath, so if you don't need create a new configuration file, you just need add configuration to the 2 files. But let's careful, because if you don't want to run with EzyEmbeddedServer like this but you want to run your application on ezyfox-server, so you should not use application.properties and application.yaml file, because there are many application on ezyfox-server, so ezyfox-server will not know to read what's file, maybe it will read the first one. So if you want to place your configuration file in classpath, so you should named it like your-app-name-config.[properties or yaml] To know in deep how does EzyFox Server read configuration file, please read this postRun with specific profile
In a real project, you will always has some environment to run (i.e local, alpha, beta, prod). You can create your configuration files with -local, -alpha, -beta, -prod suffix, and when you want to run with a specific profile, you just need set active_profiles or ezyfox.active_profiles in your properties like this.
Run embedded server on Eclipse
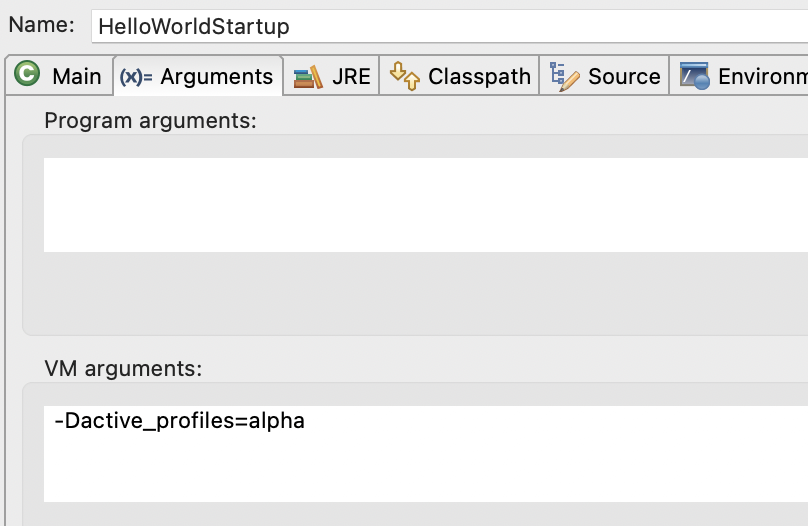
In Arguments tab, you just need add a VM argument -Dactive_profiles=alpha and run. If you want to run multi profile, you just need input that profiles with comma to separate like this: -Dactive_profiles=alpha,beta,prod
Run embedded server on IntelliJ
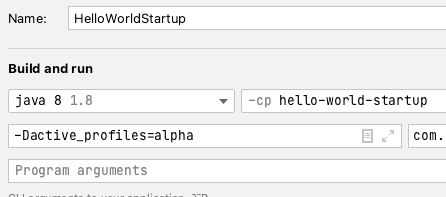
Same to Eclipse, you just need move to Build and run area -> Add VM Options and input -Dactive_profiles=alpha and run
Run with ezyfox-server
On linux you can run:
./console.sh -Dactive_profiles=alpha
To view console log or run
./start-service.sh -Dactive_profiles=alpha
To run exyfox-server in background On window you can run:
console.bat "-Dactive_profiles=alpha"
If you can not run with active profiles, maybe you need download the latest version of ezyfox-server here.
Map configuration to Class
You can map configuration to a class. Let's say we have a configuration file with content:
environment=local
database.name=hello-world
database.host=localhost
database.port=27017
You just need add @EzyPropertiesBean to the class like this:
    @Data
    @EzyPropertiesBean
    public class PluginConfig {
        private String environment;
        private DatabaseConfig database;
        @Data
        public static class DatabaseConfig {
            private String name;
            private String host;
            private int port;
        }
    }
And the class PluginConfig will become a bean, and you can inject everywhere like this:
    @EzyAutoBind
    private PluginConfig pluginConfig;
And you also can map configuration to a class with prefix of properties:
    @Data
    @EzyPropertiesBean(prefix = "database")
    public static class DatabaseConfig {
        private String name;
        private String host;
        private int port;
    }
You can refer hello-world example project to get more information
Next step
You can handle exceptions that throw in request controllers.