Introduce EzyHTTP
Updated at 16858463000001. Structure of EzyHTTP Server
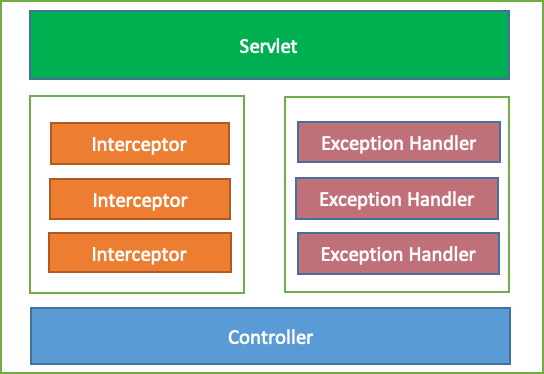
- When client request to server, Servlet receive the request first
- The request must pass through the list of interceptor before pass to controller
- The controller handle the request and return response to the Servlet
- If have any exceptions unprocessed by the Interceptor and the Controller, an ExcetionHandler will process that exception and return result to the Servlet
- After all the Servlet will send the response to client
2. Install EzyHTTP
To create a http server application we need add dependency To use http client we need add dependency
<dependency>
    <groupId>com.tvd12</groupId>
    <artifactId>ezyhttp-server-boot</artifactId>
    <version>1.3.2</version>
</dependency>
<dependency>
    <groupId>com.tvd12</groupId>
    <artifactId>ezyhttp-client</artifactId>
    <version>1.3.2</version>
</dependency>
The latest version can be found in the Maven Central repository.
3. Example
Let’s say we need create an http server application to manage user, we need 2 apis
- api/v1/users/add: Add user to system
- api/v1/users/{username}: Get user by name
Firstly, we need create a maven project with
- name: user-management-application
- package: com.example.user_management
- java version: 1.8
Next, we need add ezyhttp-server-boot dependency We use lombok to generate getter, setter, constructor so you need install and add lombok dependency to pom.xm
3.1 Create the application entry point class
    package com.example.user_management;
    import com.tvd12.ezyhttp.server.boot.EzyHttpApplicationBootstrap;
    import com.tvd12.ezyhttp.server.core.asm.RequestHandlerImplementer;
    public class App {
        public static void main(String[] args) throws Exception {
            RequestHandlerImplementer.setDebug(true);
            EzyHttpApplicationBootstrap.start(App.class);
        }
    }
3.2 Create User class to keep user information
    package com.example.user_management.entity;
    import lombok.AllArgsConstructor;
    import lombok.Getter;
    import lombok.NoArgsConstructor;
    import lombok.Setter;
    @Getter
    @Setter
    @NoArgsConstructor
    @AllArgsConstructor
    public class User {
        protected String username;
        protected String password;
    }
3.3 Create UserService class to manage user information
    public class UserService {
        protected final Map users = new ConcurrentHashMap<>();
        public User addUser(User user) {
            return users.put(user.getUsername(), user);
        }
        public User getUser(String username) {
            return users.get(username);
        }
    }
3.4 Create UserController class to handle request from client
    package com.example.user_management.controller;
    import com.example.user_management.entity.User;
    import com.example.user_management.service.UserService;
    import com.tvd12.ezyfox.bean.annotation.EzyAutoBind;
    import com.tvd12.ezyhttp.core.exception.HttpConflictException;
    import com.tvd12.ezyhttp.core.exception.HttpNotFoundException;
    import com.tvd12.ezyhttp.core.response.ResponseEntity;
    import com.tvd12.ezyhttp.server.core.annotation.*;
    import lombok.Setter;
    @Setter
    @Controller("/api/v1/users")
    public class UserController {
        @EzyAutoBind
        protected UserService userService;
        @DoPost("/add")
        public ResponseEntity addUser(@RequestBody User user) {
            User existed = userService.addUser(user);
            if(existed == null)
                return ResponseEntity.ok(Boolean.TRUE);
            throw new HttpConflictException("user: " + user.getUsername() + " existed");
        }
        @DoGet("/{username}")
        public User getUser(@PathVariable("username") String username) {
            User user = userService.getUser(username);
            if(user != null)
                return user;
            throw new HttpNotFoundException("user: " + username + " not found");
        }
    }
3.4 Create logback.xml file in src/resources folder with content:
<configuration>
    <appender name="console">
        <encoder>
            <pattern>
                %d{yyyy-MM-dd HH:mm:ss.SSS} [%t] %-5level %logger{36} %msg%n
            </pattern>
        </encoder>
    </appender>
    <root level="info">
        <appender-ref ref="console"></appender-ref>
    </root>
</configuration>
Ok, we done all, let’s start main class ‘App’ and great! We’ve had a http server application.
3.5 Let’s take a test on postman
With api: /api/v1/users/add we have:
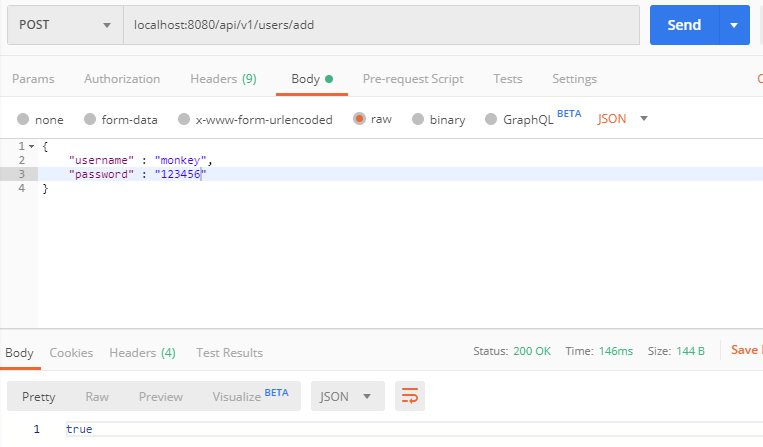
With api: /api/v1/users/{username} we have:

Awesome! Everything ok.
4. Create a client example
With client, we have 2 way (2 class) to call http request
- HttpClient: A simple http client, it simply open a connection, send the request and return the response, it only supports sync method
- HttpClientProxy: It use HttpClient class to send the request, but every request will add to a queue, and we need config number of threads to process this queue. It supports both sync and async method
Firstly, we need add ezyhttp-client dependency to maven Next, create a test package with name: com.example.user_management.test in src/test/java folder
4.1 To test /api/v1/users/add api
We need create a class ApiAddUserTest with content:
    package com.example.user_management.test;
    import com.example.user_management.entity.User;
    import com.tvd12.ezyhttp.client.HttpClient;
    import com.tvd12.ezyhttp.client.request.PostRequest;
    import com.tvd12.ezyhttp.client.request.Request;
    import com.tvd12.ezyhttp.client.request.RequestEntity;
    import com.tvd12.ezyhttp.core.constant.StatusCodes;
    public class ApiAddUserTest {
        public static void main(String[] args) throws Exception {
            HttpClient httpClient = HttpClient.builder()
                    .build();
            User body = new User();
            body.setUsername("dev");
            body.setPassword("123456");
            RequestEntity entity = RequestEntity.body(body);
            Request request = new PostRequest()
                    .setURL("http://localhost:8080/api/v1/users/add")
                    .setEntity(entity)
                    .setResponseType(Boolean.class)
                    .setResponseType(StatusCodes.CONFLICT, String.class);
            Boolean reponse = httpClient.call(request);
            System.out.println("add user reponse: " + reponse);
        }
    }
And we get output: add user response: true.
4.2 To test /api/v1/users/add api
We need create a class ApiAddUserTest with content:
    package com.example.user_management.test;
    import com.tvd12.ezyhttp.client.HttpClientProxy;
    import com.tvd12.ezyhttp.client.request.GetRequest;
    import com.tvd12.ezyhttp.client.request.Request;
    import com.tvd12.ezyhttp.client.request.RequestEntity;
    import com.tvd12.ezyhttp.core.constant.StatusCodes;
    public class ApiGetUserTest {
        public static void main(String[] args) throws Exception {
            HttpClientProxy httpClient = HttpClientProxy.builder()
                    .build();
            httpClient.start();
            RequestEntity entity = RequestEntity.builder().build();
            Request helloRequest = new GetRequest()
                    .setURL("http://localhost:8080/api/v1/users/dev")
                    .setEntity(entity)
                    .setResponseType(String.class)
                    .setResponseType(StatusCodes.NOT_FOUND, String.class);
            String reponse = httpClient.call(helloRequest, 10000);
            System.out.println("get user reponse: " + reponse);
        }
    }
And we can see the output:
get user reponse: {"username":"dev","password":"123456"}
5. Conclusion
With EzyHTTP everything are simple, you don’t need care about HttpServlet, HttpRequest, HttpResponse, how to serialize/deserialize request/response and bean management, with IOC EzyHTTP will care for you.
6. List of examples
- ezydata-jpa: an example uses EzyHTTP and ezydata-jpa
- ezydata-mongodb: an example uses EzyHTTP and ezydata-mongodb
- ezydata-redis: an example uses EzyHTTP and ezydata-redis
- ezyhttp-login: an example uses EzyHTTP to login via google and facebook or username and password
- ezyhttp-thymeleaf: an example uses EzyHTTP and ezyhttp-thymeleaf
Next
We can see how to handle client request.