Deploy EzyPlatform on Ubuntu
Updated at 1777883681000EzyPlatform can be deployed on different operating systems, but it is recommended to use Linux-based operating systems such as Ubuntu or CentOS for automatic restart capabilities. Here, I will use Ubuntu as the operating system.
Minimum configuration
- 1 CPU core
- 2GB RAM
Recommended configuration
- 2 CPU cores
- 4GB RAM
Accessing the server
For example, suppose you have a server with the IPv4 address
102.74.182.23, SSH port 22 open, a root account, and the password 12345678. You can use the following command to access the server:ssh root@102.74.182.23
Press
Enter, then enter the password 12345678 to log in.Adding SSH public keys
Logging in with a password every time can be inconvenient, so you can add SSH public keys to make authentication easier.
mkdir -p ~/.ssh
nano ~/.ssh/authorized_keys
# add key and close
Change Timezone
timedatectl list-timezones | grep <keyword>
sudo timedatectl set-timezone your_time_zone
timedatectl
Install Firewall
Note that you only need to install the firewall for servers or VPSs that do not have a firewall service.
sudo ufw default deny incoming
sudo ufw default allow outgoing
sudo ufw allow ssh
sudo ufw enable
sudo ufw allow http
sudo ufw allow https
If your application uses sockets and websockets, you will need to open additional ports.
-
3005for sockets -
2208if you only use ws -
2812if you use wss -
2611if you use UDP
sudo ufw allow 3005
sudo ufw allow 2208
sudo ufw allow 2812
sudo ufw allow 2611/udp
Quick Installation
If you want to deploy EzyPlatform quickly, you can follow the steps below.
Enable admin port
You can enable
9090 port:sudo ufw allow 9090
Create the file install-ezyplatform.sh
Its content is as follows: https://gist.github.com/tvd12/3b0672cd9f7e4f99af8e6ab999048b95
Run the script
You can run bellow script to install java, mysql, nginx, certbot:
bash install-ezyplatform.sh
The result you will get is:
Installation completed.

Database:
  name: ezyplatform
  user: ezyplatform
  password: wzb20wRTZEauVn5r6As0Y1u0

EzyPlatform:
  directory: /root/ezyplatform
  setup file: /root/ezyplatform/settings/setup.properties

Next steps:
  1. Open:
     http://<server-ip>:9090/setup-admin
  2. Complete admin setup in the browser.
  3. If you want to inspect the log:
     cd /root/ezyplatform
     tail -f logs/admin-server.log

Notes:
  - Nginx and Certbot were installed only. No site or SSL configuration was created.
  - Admin is started automatically at the end of the installation.
  - Admin access is expected directly via IP:9090 as requested.
  - If port 9090 is already listening, the script keeps the existing service and does not stop/restart it.
Now you can access
http://<server-ip>:9090/setup-admin to proceed with the installation and start using EzyPlatform.After that, to set up your domain and SSL, you can follow this guide.
Notes
If you encounter any errors while running the script, you will need to SSH into the server to check. You can create a file named
uninstall-java-mysql-nginx-certbot.sh with the following content: https://gist.github.com/tvd12/4006839a33f10c3c163aac492e6b403bThen run it to remove all components from the server, including Java, MySQL, Nginx, and Certbot, so you can reinstall everything from scratch.
Or you can follow the step-by-step instructions below.
Step-by-Step Installation
If you want a more careful installation process with more detailed configuration, you can follow the steps below.
Install MySQL
Refer to: How To Install MySQL on Ubuntu 20.04.
sudo apt update
sudo apt install mysql-server
sudo systemctl start mysql.service
MySQL Configuration
sudo mysql
ALTER USER 'root'@'localhost' IDENTIFIED WITH mysql_native_password BY '<new password>';
exit
mysql -u root -p
ALTER USER 'root'@'localhost' IDENTIFIED WITH auth_socket;
exit
sudo mysql_secure_installation
You can use this tool to generate the password.
Create Database
CREATE SCHEMA `new_schema` DEFAULT CHARACTER SET utf8 COLLATE utf8_bin ;
Create a new user, for example:
CREATE USER '<username>'@'localhost' IDENTIFIED BY '<password>';
GRANT ALL PRIVILEGES ON new_schema . * TO '<username>'@'localhost';
Install Nginx
Refer to: How To Install Nginx on Ubuntu 20.04
sudo apt update
sudo apt install nginx
systemctl status nginx
Restart Nginx:
sudo systemctl stop nginx
sudo systemctl start nginx
sudo systemctl restart nginx
sudo systemctl reload nginx
Remove the default file in the
/etc/nginx/sites-enabled and /etc/nginx/sites-available directories.Go to the
/etc/nginx/sites-enabled directory and create two files for the public site and admin site.Public site, for example
<host name>:
server {
    server_name <host name>;

    location / {
        proxy_set_header X-Forwarded-For $remote_addr;
        proxy_set_header X-Forwarded-Proto $scheme;
        proxy_set_header Host $http_host;
        proxy_pass "http://127.0.0.1:8080";
        client_max_body_size 50M;
    }
}
If you want to add
Cache-Control header for web you can add:
location ~* \.(css|js|woff|woff2|ttf|gif|jpg|jpeg|png|svg|webp)$ {
        expires 1h;
        add_header Cache-Control "public, max-age=3600";
        proxy_pass "http://127.0.0.1:8080";
}
If you want to instruct the browser to cache both audio and video files, you can add:
location ~* .(mp3|mp4|ogg)$ {
        expires 24h;
        add_header Cache-Control "public, max-age=86400";
        add_header Accept-Ranges bytes;
        proxy_pass "http://127.0.0.1:8080";
}
If your website allows users to upload content, you can add:
location /api/v1/media/add {
    proxy_pass http://127.0.0.1:8080;
    proxy_http_version 1.1;
    proxy_set_header Host              $host;
    proxy_set_header X-Forwarded-Proto $scheme;
    proxy_set_header X-Forwarded-For   $proxy_add_x_forwarded_for;

    proxy_request_buffering off;
    proxy_buffering off;
    client_max_body_size 100M;
}
Admin site, for example
admin.<host name>:
server {
    server_name admin.<host name>;

    location / {
        proxy_set_header X-Forwarded-For $remote_addr;
        proxy_set_header X-Forwarded-Proto $scheme;
        proxy_set_header Host $http_host;
        proxy_pass "http://127.0.0.1:9090";
        client_max_body_size 100M;
    }

    location /api/v1/media/add {
        proxy_pass http://127.0.0.1:9090;
        proxy_http_version 1.1;
        proxy_set_header Host              $host;
        proxy_set_header X-Forwarded-Proto $scheme;
        proxy_set_header X-Forwarded-For   $proxy_add_x_forwarded_for;

        proxy_request_buffering off;
        proxy_buffering off;
        client_max_body_size 100M;
    }
}
If you want to add
Cache-Control header for admin you can add:
location ~* \.(css|js|woff|woff2|ttf|gif|jpg|jpeg|png|webp)$ {
        expires 24h;
        proxy_pass "http://127.0.0.1:9090";
}
Check the Nginx configuration:
sudo nginx -t, if it displays like this, it's okay.nginx: the configuration file /etc/nginx/nginx.conf syntax is ok nginx: configuration file /etc/nginx/nginx.conf test is successful
Restart Nginx
sudo systemctl reload nginx
Install Certbot
sudo apt install certbot python3-certbot-nginx
sudo certbot
After using Certbot, the configuration file may be changed like this:
server {
    server_name admin.tvd12.com;

    location / {
        proxy_set_header X-Forwarded-For $remote_addr;
        proxy_set_header Host $http_host;
        proxy_pass "http://127.0.0.1:9090";
        client_max_body_size 100M;
    }

    listen 443 ssl; # managed by Certbot
    ssl_certificate /etc/letsencrypt/live/tvd12.com/fullchain.pem; # managed by Certbot
    ssl_certificate_key /etc/letsencrypt/live/tvd12.com/privkey.pem; # managed by Certbot
    include /etc/letsencrypt/options-ssl-nginx.conf; # managed by Certbot
    ssl_dhparam /etc/letsencrypt/ssl-dhparams.pem; # managed by Certbot

}
Then restart Nginx:
sudo systemctl reload nginx.Install JDK 8
Refer to: How To Install Java with Apt on Ubuntu 20.04.
sudo apt update
java -version
Running these commands will display the list of Java installations.
apt install default-jre
apt install openjdk-11-jre-headless
apt install openjdk-8-jre-headless
apt install openjdk-9-jre-headless
Choose
openjdk-8-jre-headless for the apt install.Set up
JAVA_HOME by adding the following line to the .bash_profile using vim. You can open this file with the following command:vi ~/.bash_profile
Then press
i to switch to insert mode, and paste the following line into the file:
export JAVA_HOME=/usr/lib/jvm/java-1.8.0-openjdk-amd64
Next, press
Esc, type Shift + :, then press x and Enter to exit the vim editor.Then run:
source ~/.bash_profile to apply.Install EzyPlatform
You can download the latest version from the Home page and then use a tool to copy it to the server, or use
wget and inspect the download button on the Home page to get the latest version, for example:wget https://ezyplatform.com/api/v1/platforms/1.3.3/download && mv download ezyplatform.zip
Then unzip the file:
unzip ezyplatform.zip.Navigate to the
ezyplatform/settings folder and modify the setup.properties file (e.g., nano settings/setup.properties) with the database information you created earlier, for example:datasource.jdbc_url=jdbc:mysql://localhost:3306/<databaseName> datasource.driver_class_name=com.mysql.cj.jdbc.Driver datasource.username=<username> datasource.password=<password> tables.create_manually=false
Start by running in
console mode first to check for any errors:
bash cli.sh "console admin"
If you see
EZHTTP READY printed in the console and no exceptions, it means the startup was successful.From here, let's assume the website you want to create is `tvd12.com`. Open your browser and go to: `https://admin.tvd12.com/setup-admin`, where you will see the setup screen:
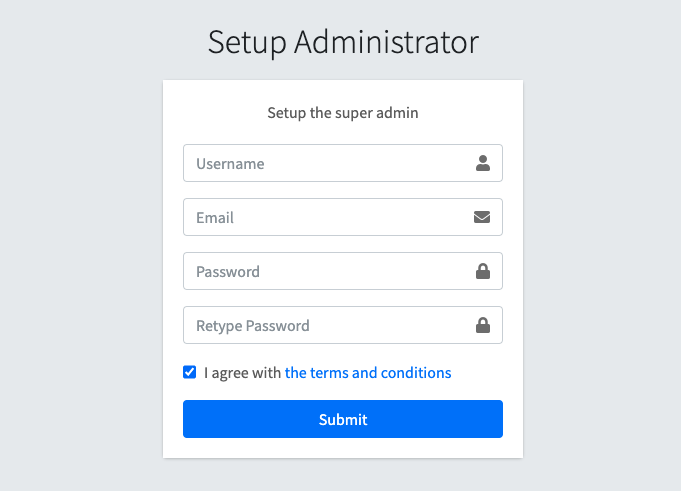
Set up the necessary information and submit, then the home screen will be displayed:
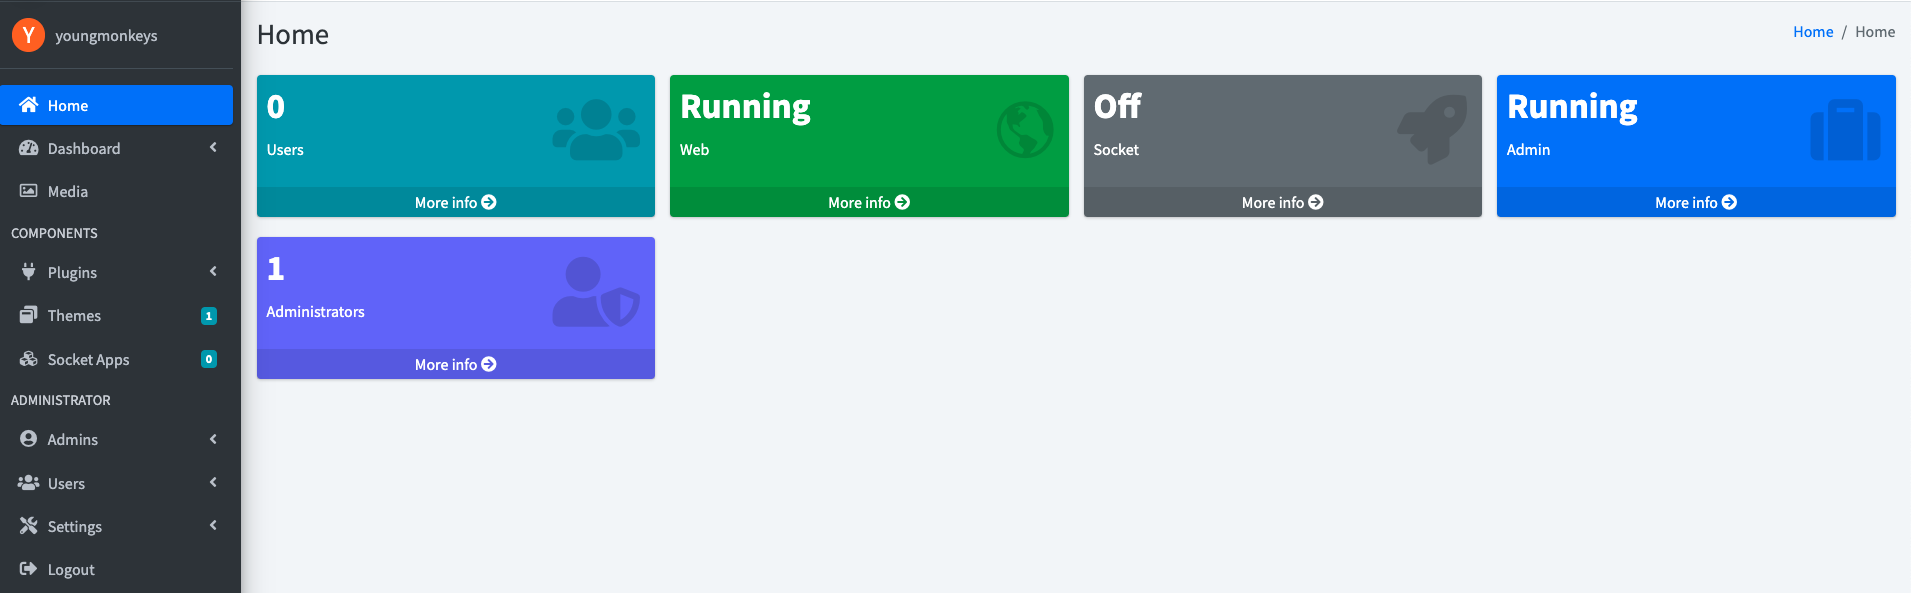
Make sure you turn off all ezyplatform websites running on
localhost and clear all cookies.Go to
Dashboard > Admin and update the Admin URL and Admin Properties, for example: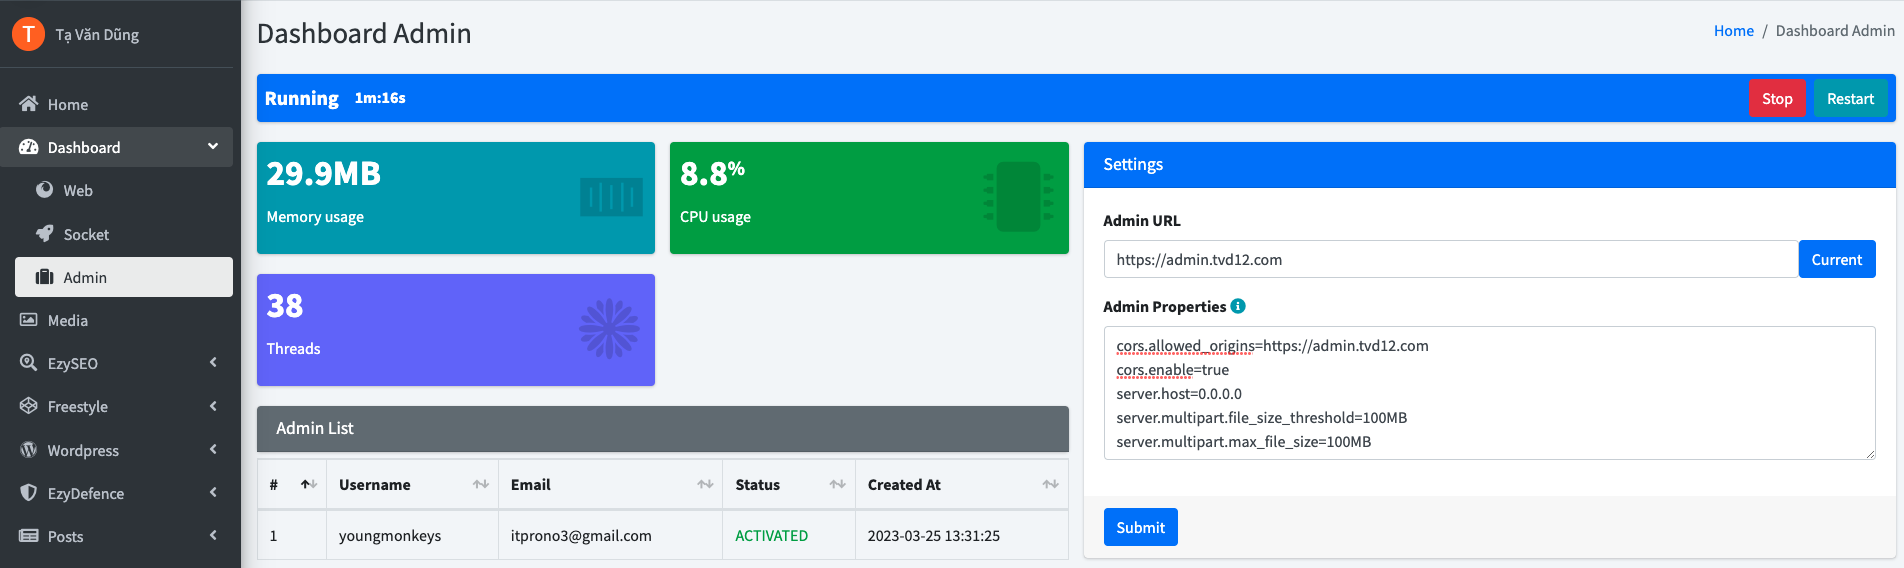
https://admin.tvd12.com
cors.allowed_origins=https://admin.tvd12.com
cors.enable=true
server.host=0.0.0.0
server.multipart.file_size_threshold=100MB
server.multipart.max_file_size=100MB
server.multipart.max_request_size=100MB
server.port=9090
Now, turn off the console mode by pressing
Ctrl+C, and start in the background mode:
bash cli.sh "start admin" ; tail -f logs/admin-server.log
Wait for about 10-15 seconds for the server to finish startup, then go back to your browser and select
Dashboard > Web. Update the Web URL and Web properties, for example: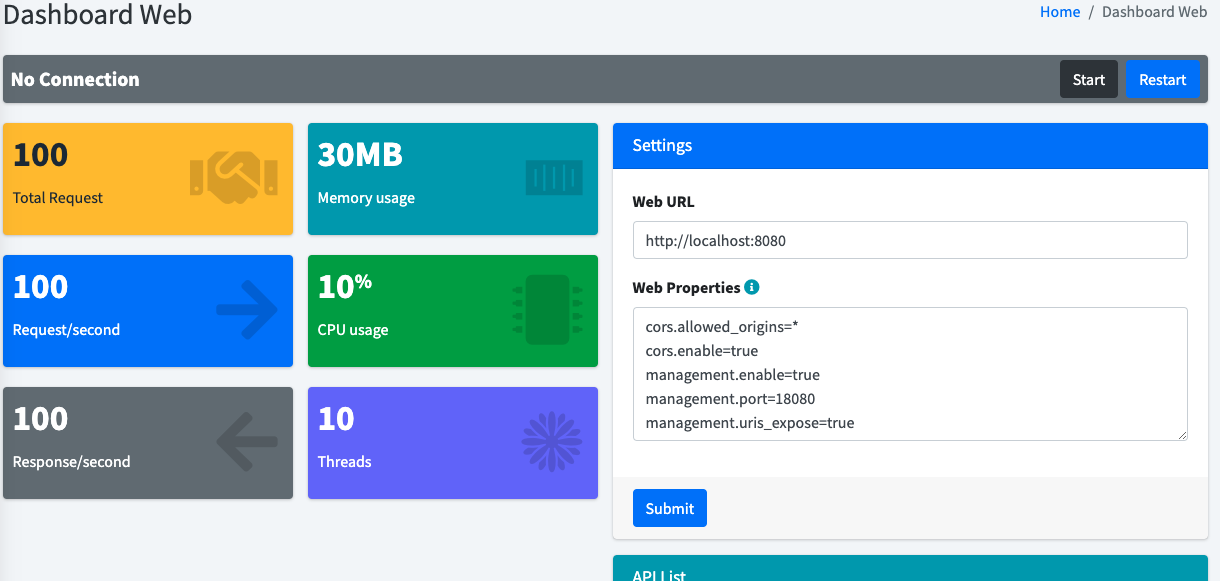
https://tvd12.com
cors.allowed_origins=https://tvd12.com,https://admin.tvd12.com
cors.enable=true
management.enable=true
management.port=18080
management.uris_expose=true
resources.enable=true
resources.locations=static
resources.upload.enable=true
server.allow_override_uri=true
server.host=0.0.0.0
server.multipart.file_size_threshold=100MB
server.multipart.max_file_size=100MB
server.multipart.max_request_size=100MB
server.port=8080
Then click the start button. Wait for 10-15 seconds and you can access:
https://tvd12.com.Setup SSL for socket
If you don't need to use socket or you are in localhost, you can skip this step.
- You can look at here to see how to create a keystore file.
- After you have the keystore file, you can upload and set the password via
Dashboard > Socket > SSL configuration.
Congratulations! You have successfully deployed EzyPlatform on an Ubuntu server. Next, you can install themes and plugins according to your preferences.
For Java 17+
You will need to create a file named
vm-options.txt with the following content:--add-opens java.base/java.lang=ALL-UNNAMED
Place this file inside the
admin, socket, and web directories of EzyPlatform, then start EzyPlatform using the command:
bash cli.sh "start admin" ; tail -f logs/admin-server.log
If EzyPlatform fails to start, you can run the following command:
bash cli.sh "console admin"
to view the error details.
Deploy with docker
If you are a fan of docker, you can refer this guide to deploy EzyPlatform with Docker.