Deploy EzyPlatform with Docker
Updated at 1777883501000Our deployment diagram can be as follows:
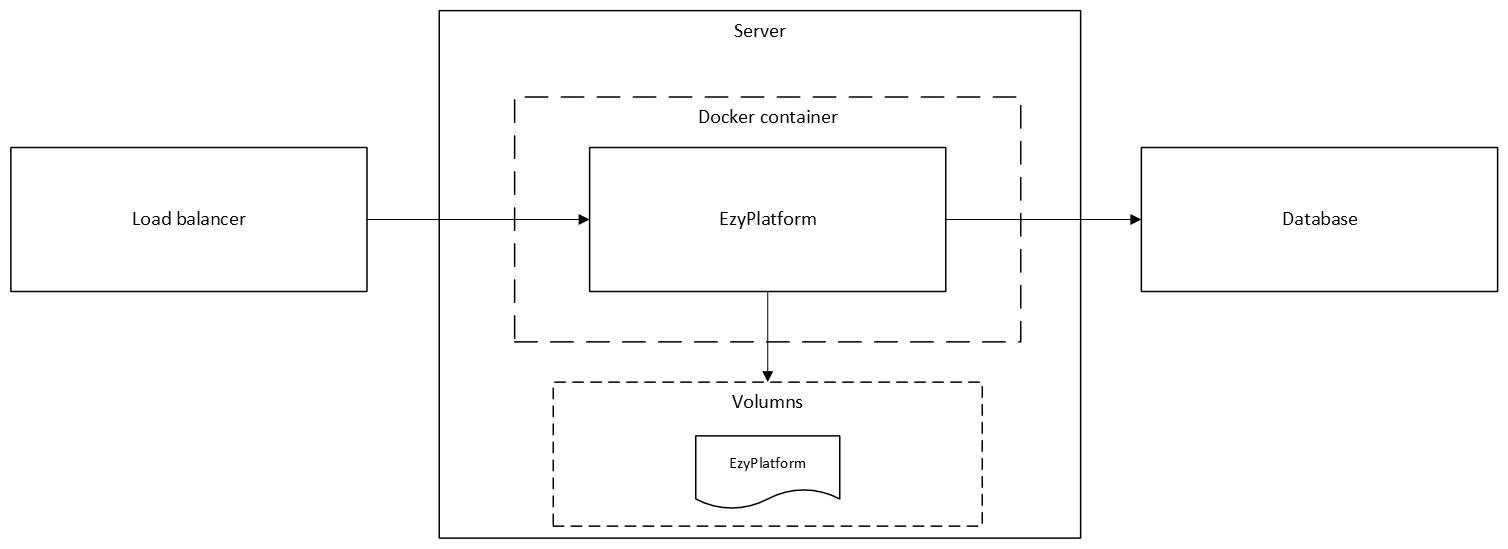
Here we keep the database outside of the container, but you can also run the database inside the container if you prefer — both options work fine.
Creating the docker-compose.yaml file
You can create a
docker-compose.yaml file with the following content:
services:
    mysql:
      image: mysql:8.0
      container_name: ezyplatform-mysql
      restart: unless-stopped
      environment:
        - MYSQL_ROOT_PASSWORD=
        - MYSQL_DATABASE=
        - MYSQL_USER=
        - MYSQL_PASSWORD=
      ports:
        - "13306:3306"
      volumes:
        - mysql-data:/var/lib/mysql
      networks:
        - ezyplatform-network
      healthcheck:
        test: ["CMD", "mysqladmin", "ping", "-h", "localhost"]
        timeout: 20s
        retries: 10
    ezyplatform:
      image: youngmonkeys/ezyplatform-only
      container_name: ezyplatform
      restart: unless-stopped
      depends_on:
        mysql:
          condition: service_healthy
      environment:
        - DATASOURCE_JDBC_URL=
        - DATASOURCE_DRIVER_CLASS_NAME=
        - DATASOURCE_USERNAME=
        - DATASOURCE_PASSWORD=
        - EZY_CREATE_TABLE_MANUALLY=
        - EZY_ENCRYPTION_KEY=
        - EZY_SOCKET_START=
      ports:
        - "9090:9090"
        - "8080:8080"
        - "3005:3005"
        - "2208:2208"
        - "2611:2611/udp"
      networks:
        - deploy-network
        - ezyplatform-network
      volumes:
        - ezyplatform-data:/app/ezyplatform
volumes:
  mysql-data: {}
  ezyplatform-data: {}
networks:
  ezyplatform-network: {}
  deploy-network:
    name:
    external:
In this configuration:
- Ports 9090 and 8080 are for HTTP; you will need to expose these ports.
- Ports 3005, 2208, and 2611 are for socket services. If your project does not require them, you can remove them.
Running the services
You can run the stack with:
docker compose up
If you want to run it in console mode.
Or:
docker compose up -d
If you want to run it in the background.
After starting successfully, you can access
http://server_ip:9090. However, you may want to complete the installation only after configuring your load balancer.Load balancer configuration
You can configure your load balancer to attach domain names and SSL certificates to your project. For example:
-
https://yourdomain.com→http://server_ip:8080 -
https://admin.yourdomain.com→http://server_ip:9090
After that, you can proceed with setting up the EzyPlatform admin just like in the standard non-Docker installation.