


Import a plugin project to IntelliJ
Updated at 1787842261000Overview
This article shows you how to import an existing EzyPlatform plugin project into IntelliJ IDEA so you can read the code, build it, debug it, and continue developing new features.
A common case is that you already have the source code of a plugin, such as an admin plugin, web plugin, socket plugin, socket app, or theme, but you are not sure how to open the project in IntelliJ so Maven can recognize the correct dependencies, environment variables, and dependent plugins.
After completing this guide, you will be able to:
- Import a plugin project into IntelliJ IDEA.
- Check that IntelliJ recognizes the project as a Maven project.
- Run Maven
installto build the plugin. - Handle common errors when the project is missing dependent plugins or IntelliJ does not recognize environment variables.
- Know what to do next after the project has been imported successfully.
Prepare before importing
Before opening the plugin project in IntelliJ, you need to prepare a local EzyPlatform development environment.
If you have not set up the environment yet, follow this guide: Set up the EzyPlatform development environment.
At minimum, your machine should have:
- JDK 8.
- Apache Maven.
- IntelliJ IDEA.
- A local EzyPlatform installation that is installed and able to run.
- EzyPlatform SDK installed.
- The
EZYPLATFORM_HOMEenvironment variable pointing to the EzyPlatform installation directory. - Any dependent plugins installed in EzyPlatform if the current project requires them.
You should also check the plugin project's `pom.xml` file first. This file tells you which modules, plugins, and versions the project depends on. When a build fails, `pom.xml` is usually the first place to inspect.
Import the project into IntelliJ
If you do not already have a plugin project to import, you can start in one of two ways:
- Create a new plugin with EzyPlatform SDK by following Create a plugin if you want to develop your own plugin from scratch.
- Clone the example projects from ezyplatform-examples if you want to learn from sample source code first.
For an example project, after cloning the repository to your machine, choose the exact plugin directory you want to open. If the repository contains multiple subprojects, avoid opening a parent directory that is too broad. Prefer the directory that contains the
pom.xml file of the plugin you want to import.
First, open IntelliJ IDEA and select
Open or Import Project, then choose the root directory of the plugin project.The root directory is usually where the
pom.xml file is located. When you choose the correct directory, IntelliJ automatically recognizes it as a Maven project and starts indexing, downloading dependencies, and detecting source modules.During the import process, you should let IntelliJ automatically:
- Trust the project if IntelliJ asks.
- Import the Maven project.
- Download sources and documentation if you want to read code more conveniently.
- Use JDK 8 for the SDK project.
If IntelliJ does not automatically recognize the project as a Maven project, open the
pom.xml file, then click the Maven icon or choose Add as Maven Project.
Test the build with Maven install
After IntelliJ finishes importing the project, open the Maven panel on the right side of the screen. In the Maven tree, find the current project, open
Lifecycle, then run the install goal.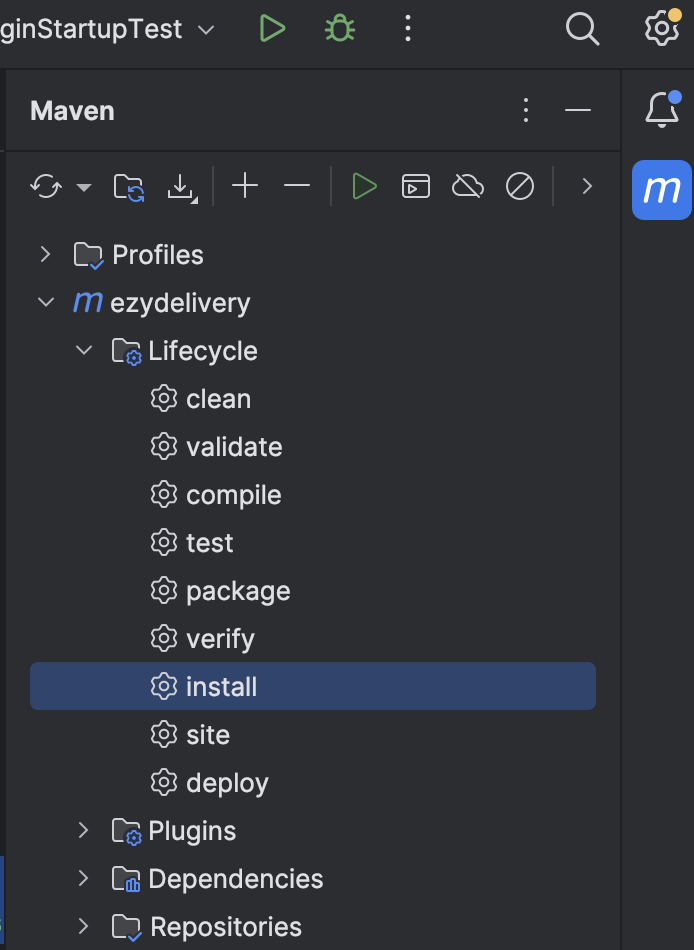
If the build succeeds, IntelliJ has recognized the project correctly, Maven dependencies are ready, and you can start developing.
If the build fails, do not rush to change the code. Read the error log first, because most errors at this step are related to the environment or dependencies.
Handle missing dependent plugins
An EzyPlatform plugin can depend on another plugin. For example, a web plugin may need a matching admin plugin, or a business plugin may require
EzyArticle, EzySupport, EzyMail, or other shared modules.When the build fails, check the Maven log and look for signs such as:
- An artifact cannot be found.
- A dependency cannot be resolved.
- A class from another plugin cannot be found.
- A dependency version in
pom.xmldoes not match the plugin version installed on your machine.
If you are not sure what the error means, you can give the error log to AI and ask:
Review this error and tell me which EzyPlatform plugin the project is missing, or which plugin has a version mismatch.
You can also check manually by opening
pom.xml and reviewing the declared dependencies, then comparing them with the list of plugins installed in your local EzyPlatform.If a dependent plugin is missing, install it by following this guide: Add a plugin to EzyPlatform.
If the plugin already exists but the version does not match, update it by following this guide: Update a plugin.
After installing or updating a plugin, run the necessary SDK command again to synchronize development dependencies. You can also refer to EzyPlatform SDK commands.
Handle IntelliJ not recognizing environment variables
If dependent plugins are installed and versions match, but the project still fails to build, IntelliJ may not be recognizing environment variables such as
EZYPLATFORM_HOME.This error often appears when
pom.xml contains a declaration like this:<ezyplatform.home></ezyplatform.home>
But IntelliJ or the Maven Importer cannot read the
EZYPLATFORM_HOME variable from the operating system.When this happens, follow this guide: Fix IntelliJ not recognizing path variable.
After reconfiguring the environment variable in IntelliJ, reload the Maven project and run
install again.After importing successfully
After the project builds successfully, you can start learning the plugin source code structure.
If this is your first time working with an EzyPlatform plugin, read this guide next: The structure of a plugin project.
That guide helps you understand important parts such as:
- The admin module.
- The web module.
- The socket module, if any.
- The controller, service, and repository structure.
- The template, static resource, and configuration file structure.
After you understand the project structure, you can start adding code for the features you need.
Run the plugin project
Importing and building successfully is only the first step. To try the plugin in a local EzyPlatform instance, you need to link or install the plugin into EzyPlatform, then start the correct admin, web, or socket server depending on the plugin type.
You can refer to the running project section in Create a plugin.
If you are developing an admin plugin, you usually need to run the admin server. If you are developing a web plugin or theme, make sure the web server has been started or restarted after the plugin is activated.
If the project still cannot be imported
If you have checked all the steps above but still cannot import or build the project, send us the following information:
- The full Maven error log.
- The contents of the
pom.xmlfile. - The EzyPlatform version you are using.
- The list of plugins installed in EzyPlatform.
- The operating system you are using.
- How you configured
EZYPLATFORM_HOME.
You can contact us through our Facebook page, Discord, or StackAsk. With a complete error log, it is much faster to determine whether the issue is a missing plugin, a version mismatch, or an incorrect environment variable.